I've been watching Adobe's Character Animator tool develop for a couple of years now. When it was first released, I wasn't entirely sure how I'd use it, but it looked interesting. The idea of using a laptop camera to drive a puppeted graphic in real-time was cool. Since then there have been all sorts of interesting uses. The Simpsons did a live call-in with Homer, Stephen Colbert put an animated Donald Trump on his show (and then the production team developed a whole cartoon series on Showtime using the technology).
My first experiments with it were for an interactive robot on I've even done some stop motion puppetry for a Rooster Teeth game/talk show called GORQ's Quest. I knew that you could play image sequences back in the program and that you could set them up to be triggered by a keyboard command so I took a bunch of photos of a robot toy that I'd gotten when I was a kid and tweaked them in Photoshop.
I had the opportunity in September to help with an event at Austin film festival Fantastic Fest called The Fantastic Feud. It's a Family Feud style gameshow focused on film nerd trivia. I realized that I could take the same triggers that I created for GORQ and use them for something Character Animator wasn't ever really intended to do, build a functioning interactive game board.
The problem:
The way the Feud created their gameshow board in 2017 was to put graphical boxes on top of an answer in Keynote. When someone guessed an answer, they'd move the mouse over the box and delete it when someone gave the correct answer. They found a hack that changed the mouse color so it was hidden, but it was an inexact process. They also couldn't put keynote into play mode, or they'd not be able to use the mouse to delete something. That meant they had to figure out ways to hide the editor edges.
They had also thought about creating multiple pages for a round where each possible combination of answers had its own page. The issue with that is that it doesn't scale particularly elegantly. If you have four answers, you have 16 possible combinations, but if you have 6, you will end up with 36 pages of possible answers. In a live situation, you'd need some sort of lookup table to know which combination to load and it would be prohibitively slow when what you the need is for the answer to pop up instantly.
One other concern was that a big part of Family Feud is only being able to get three wrong answers before a team is out. In their previous version, there wasn't an easy way to be able to put strikes up on the screen. They had had another manual process for doing this in Keynote, but it was a hassle and potentially easy to screw up.
The solution:
I had the realization that even though Adobe Character Animator is meant for creating digital puppets, who's to say what a digital puppet is? When I created GORQ, I had keyboard commands that would trigger the arms to move. The program doesn't actually know that the arms are arms, it just knows to play back the image sequence that we tied to that button. So, if you had six doors, you could set up 1-6 on the keyboard to trigger each of those little animations. If you then tell the application to pause on the last frame of each set, suddenly you've got game show doors.
Setting it up:
In the original version of the game, you had the Feud answers spin down.

To do that the way Family Feud did with this system would be too burdensome. We'd have to create an animation for each answer. That would cause a couple of different problems.
One, it would make the project even more memory intensive
It would make it very difficult to make changes
We'd have to rebuild each game board whenever a new question was added.
To solve these problems, there were two decisions. One, all of the answers would always end up as a background graphic. Two, the door animations would need to end in transparency. Here's an early test with a flipping door that has one side fade out as it flips. The animation happens quickly enough that it would almost feel like the text is flipping down.
We ended up deciding to have the doors slide open instead of flip. The main reason was that the cutout areas in the graphics that were provided by Fantastic Fest were tapered squares. If we had had the doors flip, we would have had to have them behind the top frame. With the taper, it would bang into the narrower length at the bottom. If you matched the shape of the opening to the flipped box, you'd also end up with the tapered base at the top and the full width at the bottom. It would look visually strange.

As I was researching old Family Feud episodes, I quite liked the little bit of shine on the point value as it reflected the lights from the studio. I thought I might try to get some of that same physical realness by building my door animations in Cinema 4D and creating textures that react to light. The below image is exaggerated to show better the specular highlights moving across the graphic.
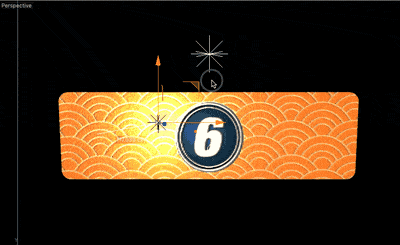
I messed with the curves in the animation until it felt like it was a semi-mechanical door open and rendered out six different door graphics. I then brought the finished renders into After Effects and added motion blur and masked them so that when the door slid out it would disappear and not get in the way of the answer next to it. I also added a bit of implied shadow on the edge to make it seem like there was some light interaction happening with the answer below the door.

One of the most commons ways for puppet to be built in Character Animator is to construct a layered Photoshop document. That means that all of our door animation frames got dragged into a layered PSD and put into folders for organization. We want the default board state to be on so we give Character Animator a normal still version of each answer door and then a folder to play back when it's instructed.


Each answer has a graphic and an animation. Our regular 'on' state in the top of the folder and then the animation in a 'Triggered' folder. Character Animator will change to the folder and play back the animation when it's told. That same process is repeated for each button. I discovered that I could drag all of the images onto my document and it would place them as smart objects without me having to manually open, copy and paste the graphics into the PSD. This trick sped up the process of building the document quite a bit.
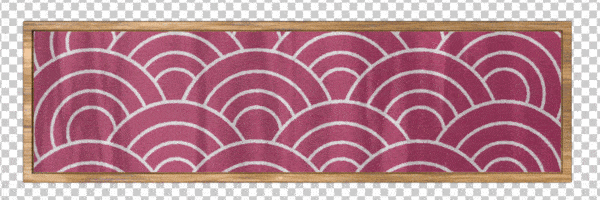
We knew that because there were questions that had four, five, and six possible answers that we'd need to create a cover-up door for when there weren't answers in that slot. By adding those cover-ups to the six answer document, we could turn those layers on when setting up the four and five answer template.
Three strikes and you're out.
To emulate the game we needed strikes. Because the design was Fantastic Fest themed, I knew that I wanted X-es that matched the look of the Fantastic Fest logo.

The logo was hand illustrated. That meant they didn't have a font where I could get an X. I grabbed a brush pen and drew several sets of brush strokes from the angles that would be used if it were calligraphy, then used Adobe Capture to vectorize them and dynamically send them to Illustrator.

It's exceptionally cool to be able to take a photo of something on my phone and tell it to open up in Illustrator on my computer. It's a streamlined process that feels like magic the first time you see it happen.
I constructed the x-es and then ran them through a couple of different photoshop grunge generators. If I know that I'm not going to be animating grunge in something I'll often run it through one of the Photoshop image processors I've bought. One I'm particularly fond of is Grinder Press from Unember.
A lot of times I'll run a graphic through multiple generators and allow my image to go through numerous levels of decomposition until I'm happy. There are lots of other ways to go about this, but sometimes you need to be quick.
When I was doing my initial research I noticed that the 70s version of Family Feud had each strike grow on to the screen because of their analog process.
Instead of just going into After Effects and adding opacity keyframes, I also added a couple of matte chokers and made the X-es grow on in a similar way. It's a super subtle thing, but it felt like a nerdy detail that was worth adding. I knew I could save some memory by telling Character Animator to play the clip forward once and then play it back to the beginning. This meant I only had to create the clip fading on. That saved a bit of memory.
Setting up the triggers
Once the document is imported into Character Animator, it'll show up as a puppet. Double-clicking will bring up the editor. All of our doors will show up like Photoshop or After Effect layers on the side of the editor.

To set up the button animations, there are two places to the right of the layer name where we can add a keyboard trigger and a behavior. The behavior we want, in this case, is Cycle Layers.

In the settings there are a couple of key checkboxes we need to check. We need to tell the folder to hide our normal 'on' version of the door, we need to tell it to pause on the last layer, and we need to go into our Triggers panel and tell it to latch when we press the key. If we didn't do this last part, as soon as we lifted our finger off of the keyboard key, it would pop the normal version of the graphic back up. We need it to latch so it feels like Character Animator is actually working as an application. When you're running the game, if you hit a key for the second time it'll reset so you need to make sure you only hit, say, the 2 key once. That's still a better option than having to hold the button down continuously.

Once you've set up one, you just rinse and repeat with the other buttons.
We also have to set up our strikes. Here's their setup. We don't need to latch these because we just want them to play when we hit the button.

To help the person who was operating the laptop we made sure the triggers were spread out on the keyboard. That makes it harder to hit a key accidentally. The answers were 1-6 on the keyboard. I made the question reveal the G key and assigned the first, second and third strikes to I, O, and P.
Lastly, I was digging the Fantastic Fest tiger mascot, so I decided to chop it up into parts and build a little transition animation in After Effects. I imported that into my master PSD and set up its Cycle Layer behavior to play immediately when the scene is launched. Because it plays as soon as you load the scene, it makes it feel like it's more of an actual app and that something is happening. Also, it's just a cool looking tiger.

Getting sound:
Now that our buttons are working, we need to find a way to bring them to life with sound. YouTube channel Digital Puppets put up a video a few months ago talking about how to do that with a free Soundboard app called Soundplant.
Soundplant allows you to assign sound files to keys on your keyboard. We dug up Family Feud sound effects on the internet, cleaned them up to remove anything that wasn't needed, and attached them to the same keys we set up in Character Animator.
There's a little switch that allows Soundplant to run in the background. As soon as you flip it, it'll work when you're back in Character Animator. Now, when you hit one of the keys, it plays the sound. Word of warning, once you're finished, make sure you turn this background feature off. As I was testing the project, I would forget to turn it off and as soon as I started typing, I'd hear all of my sounds triggering. You very quickly remember to set Soundplant back to not running in the background.
Final assembly:
Once I finished building out the six-answer question, I duplicated my first template twice, turned on the cover-up doors on five and six and deleted the keyboard triggers on those answers that weren't being used. I didn't need to, but it seemed like it was worth doing.
I went back to Photoshop and built out graphics for all of the answer sets and saved them out as jpegs. I imported those into Character animator and then started creating scenes.
Back at the beginning of the article, I talked about how painful it would be to have to render out animations for each answer. By separating the template from the responses, all I had to do was create a new scene, choose the template that had the right number of answers for that question and then drag the answer graphic into the same scene underneath the game board. It took less than ten minutes to set up all of the individual questions. Even better, once I was on site and had to make changes, as soon as I saved out a replacement graphic it automatically updated in Character Animator.
Running the show:
Once we were on site, we got the laptop that was running the game hooked up to the Alamo's projection system and made sure everything was working. Once we were in Character Animator's stream mode all we had to do to switch questions was to go to the side of our screen and double-click the next round. The scene would load, the transition would play, and everything would be ready for the operator to reveal the answers. We noticed there was a small loading pause when we switched scenes. That was revealing our second screen's desktop for a moment. Changing the desktop's background to black hid that glitch. It also helped that before the show we double clicked and opened each round. It seemed like switching scenes was faster once we'd done that. There must be some caching going on in Character Animator when scenes are loaded.
Everything went off without a hitch. The operator said having the keyboard triggers made his job exponentially easier. The door animations made the show feel more professional. Having sound effects tied to those animations brought a little more energy. I couldn't have been more excited to see Character Animator doing this thing it wasn't originally designed to do. It's given me lots of ideas for other fake apps I could build.
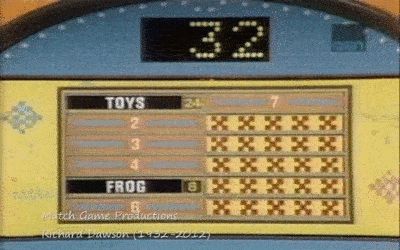
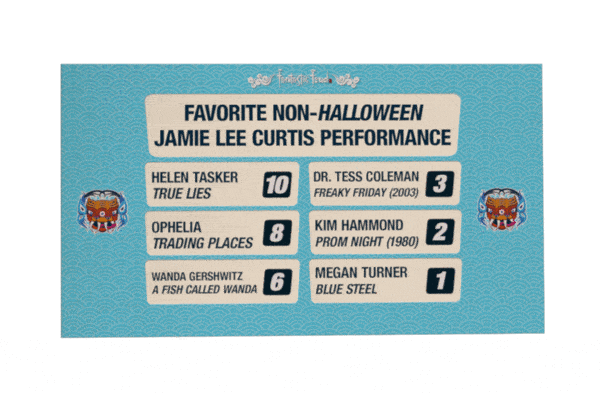
Here's the finished gameboard.
and here's some video of it in action. If you've done anything crazy with Character Animator, leave a comment. I'd love to hear what you've created. Thanks for reading.